Skip Navigation
Articles
 July 28, 2026 · Ginger Park
Recent Library Trivia Winners
See the teams who won July's Library Trivia – Evening Edition and Afternoon Edition.
July 28, 2026 · Ginger Park
Recent Library Trivia Winners
See the teams who won July's Library Trivia – Evening Edition and Afternoon Edition.
 July 23, 2026 · Adrianne Evans, library volunteer
Foodie Finds: Easy Summer Appetizers
Try easy, breezy summer appetizers that won't heat up your kitchen. As a bonus most of them use ingredients from local farmers markets.
July 23, 2026 · Adrianne Evans, library volunteer
Foodie Finds: Easy Summer Appetizers
Try easy, breezy summer appetizers that won't heat up your kitchen. As a bonus most of them use ingredients from local farmers markets.
 July 23, 2026 · Ginger Park
Great Read Alouds: Space Adventures
Take off with amazing picture books about planets, the Moon and traveling in space. Kids' imaginations will soar!
July 23, 2026 · Ginger Park
Great Read Alouds: Space Adventures
Take off with amazing picture books about planets, the Moon and traveling in space. Kids' imaginations will soar!
 July 20, 2026 · Sherry Hess
Books for Your Parenting Journey
Parenting is tough, but it is the greatest adventure you’ll ever have. Gather the resources and tools you need for a successful journey.
July 20, 2026 · Sherry Hess
Books for Your Parenting Journey
Parenting is tough, but it is the greatest adventure you’ll ever have. Gather the resources and tools you need for a successful journey.
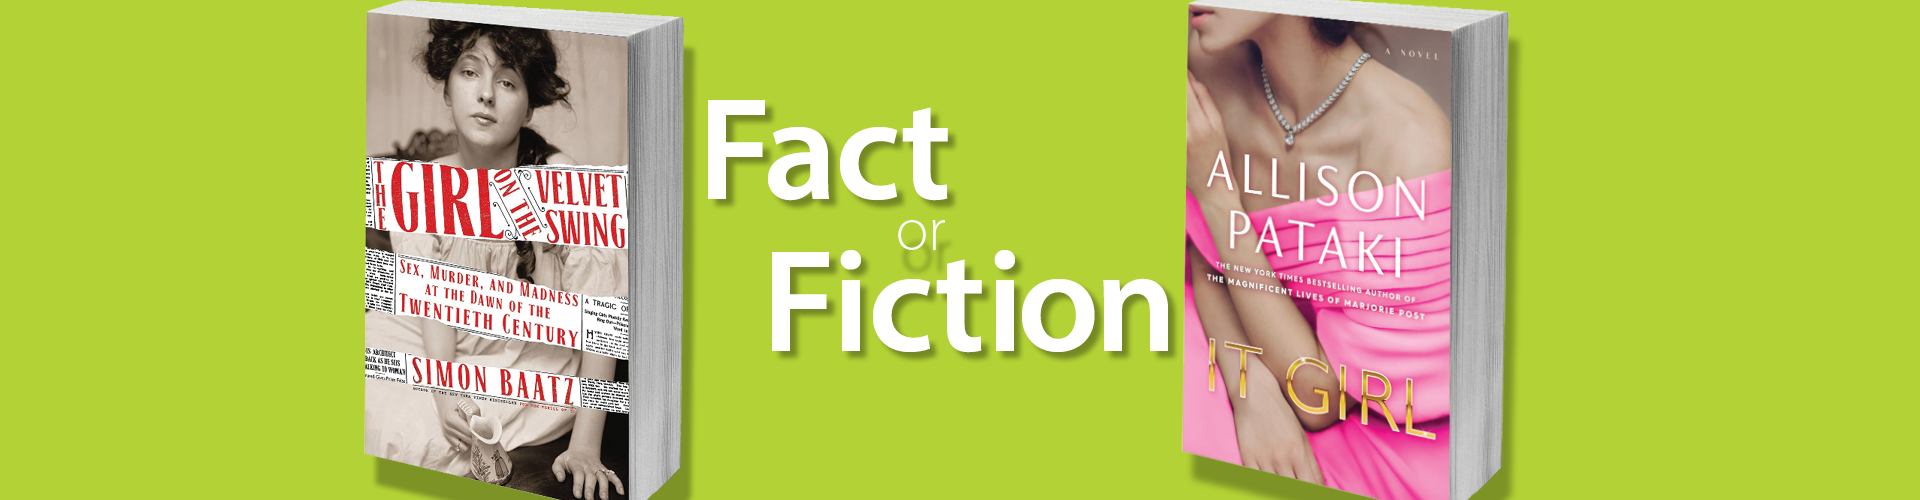 July 14, 2026 · Julie Nelson
Fact or Fiction: Meet Evelyn Nesbit, America's First Supermodel
Step into the world of one of America's first celebrities and discover the real woman behind the beautiful face through a nonfiction and fiction book.
July 14, 2026 · Julie Nelson
Fact or Fiction: Meet Evelyn Nesbit, America's First Supermodel
Step into the world of one of America's first celebrities and discover the real woman behind the beautiful face through a nonfiction and fiction book.
 July 9, 2026 · Ginger Park
What YA' Reading: Laughs
Escape with YA novels that include a supernatural cat, a superhero's reluctant love interest, friends who try to be the worst girlfriend or boyfriend, and a violent noodle cult.
July 9, 2026 · Ginger Park
What YA' Reading: Laughs
Escape with YA novels that include a supernatural cat, a superhero's reluctant love interest, friends who try to be the worst girlfriend or boyfriend, and a violent noodle cult.
 July 7, 2026 · Brea Black
Artsy Crafty Library: Natural Dyeing Made Easy
Create unique materials by dyeing fabric & yarn yourself. If you're open to a little experimentation, you can easily create beautiful earth tone dyes with supplies in your kitchen or garden.
July 7, 2026 · Brea Black
Artsy Crafty Library: Natural Dyeing Made Easy
Create unique materials by dyeing fabric & yarn yourself. If you're open to a little experimentation, you can easily create beautiful earth tone dyes with supplies in your kitchen or garden.
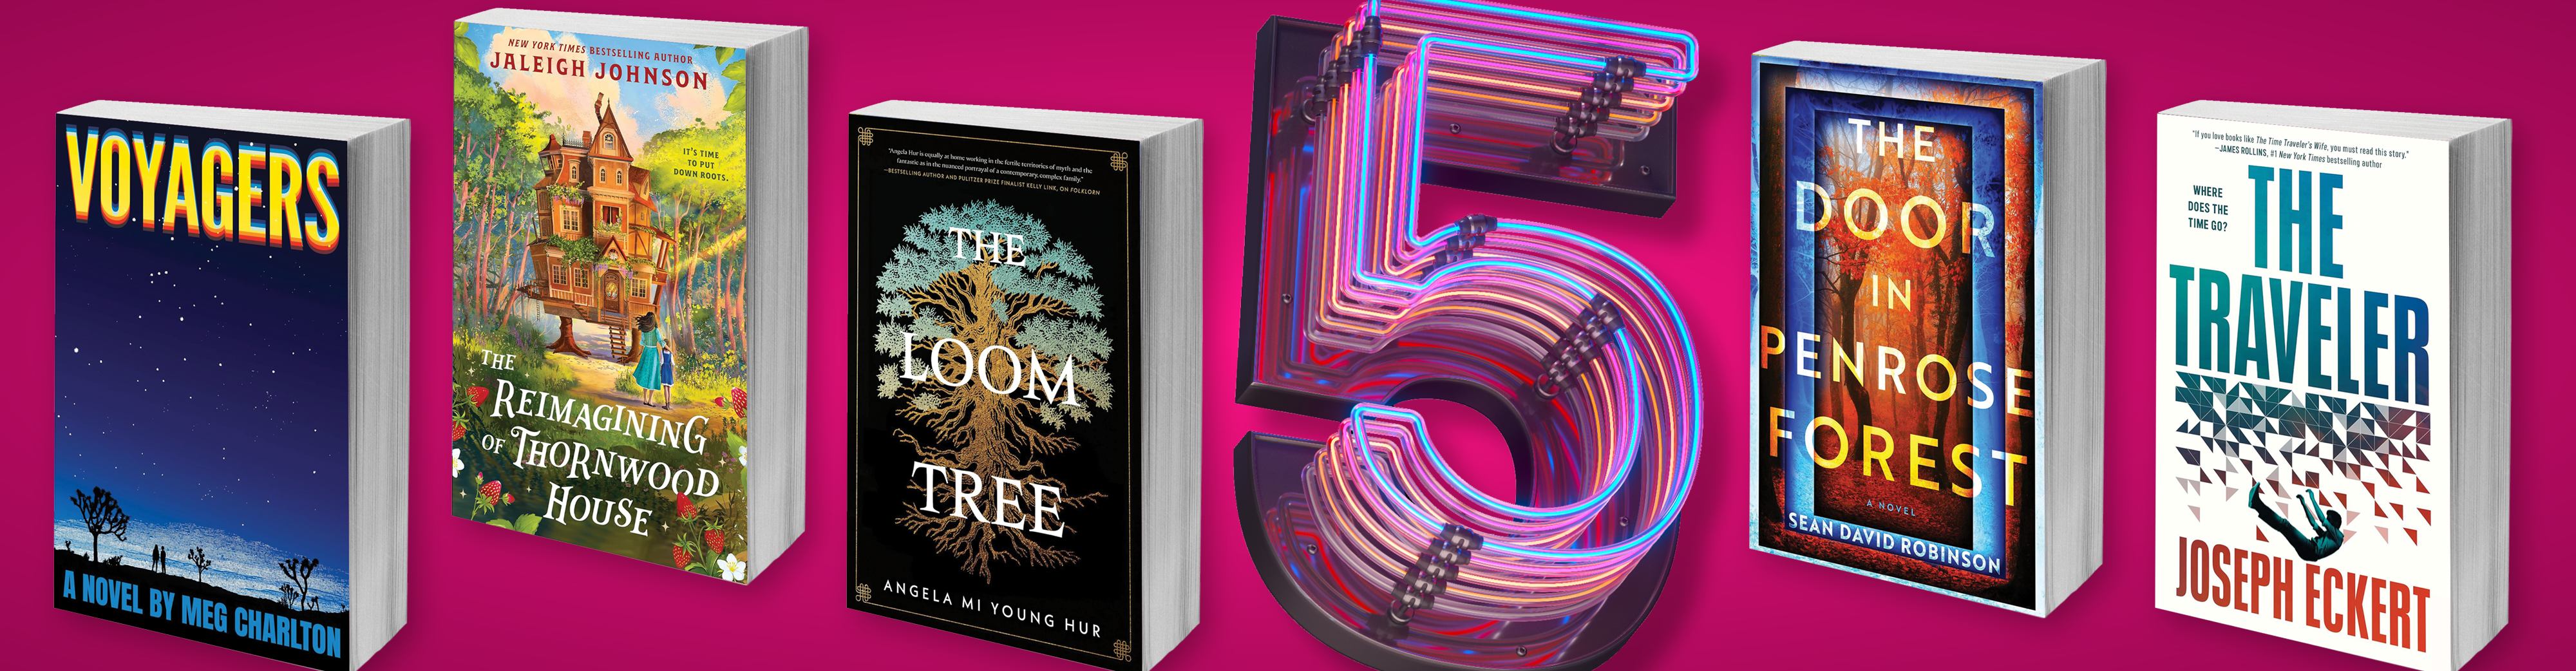
 July 3, 2026 · Chris Blocker
Fiction Five: Not So Innocent New Novels
Step into thought-provoking new tales that will move you. The characters in 3 of these 5 books are kids dealing with adult issues, situations & discoveries. Characters in the other 2 are adults who lose their innocence.
July 3, 2026 · Chris Blocker
Fiction Five: Not So Innocent New Novels
Step into thought-provoking new tales that will move you. The characters in 3 of these 5 books are kids dealing with adult issues, situations & discoveries. Characters in the other 2 are adults who lose their innocence.
 July 2, 2026 · Ginger Park
Kid Tested, Librarian Recommended: Hilarious
Find fabulous, funny and fascinating stories your kids will love. Elementary-age kids and kids librarians are big fans of books that make them laugh.
July 2, 2026 · Ginger Park
Kid Tested, Librarian Recommended: Hilarious
Find fabulous, funny and fascinating stories your kids will love. Elementary-age kids and kids librarians are big fans of books that make them laugh.
 June 30, 2026 · Kaitlyn Kriley
While You Wait for Project Hail Mary
Check out suspenseful survival stories that will give you a new perspective on human connection.
June 30, 2026 · Kaitlyn Kriley
While You Wait for Project Hail Mary
Check out suspenseful survival stories that will give you a new perspective on human connection.
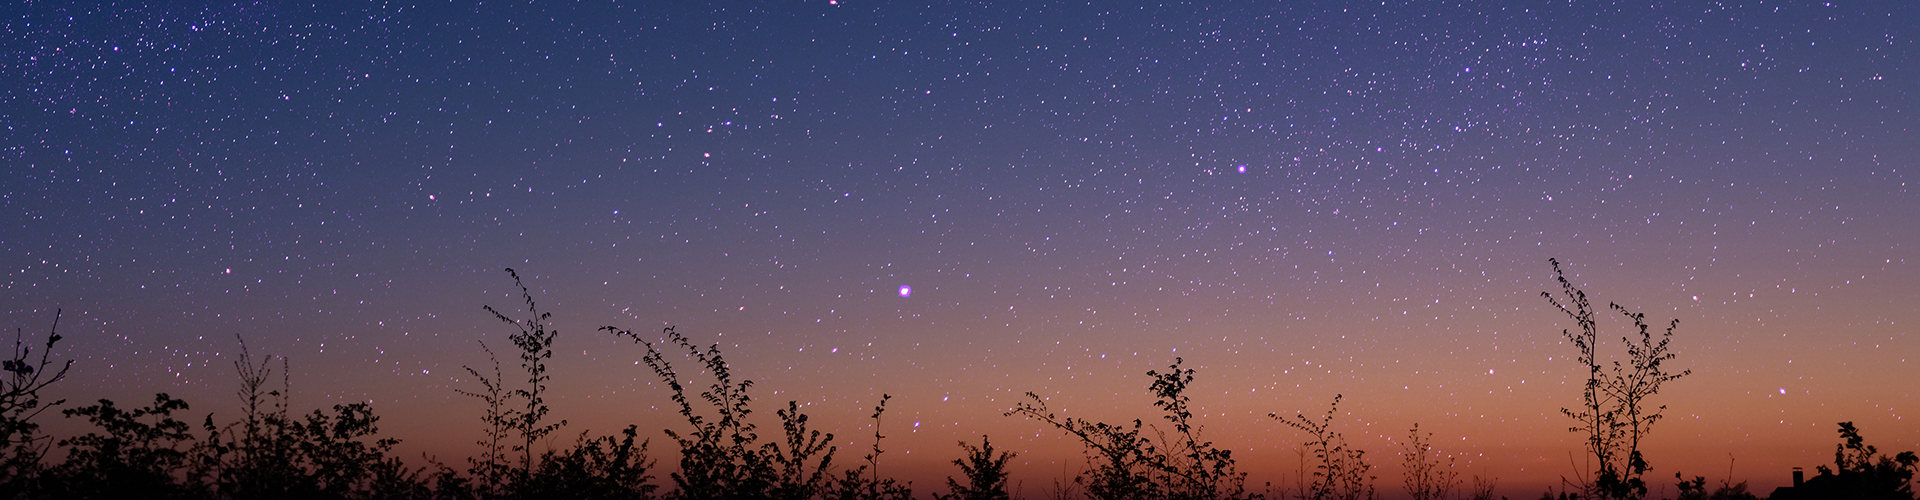 June 29, 2026 · Ginger Park
Check Out a Telescope
Adults can check out a table-top telescope to explore the night sky. You'll be amazed what you can see from your own backyard.
June 29, 2026 · Ginger Park
Check Out a Telescope
Adults can check out a table-top telescope to explore the night sky. You'll be amazed what you can see from your own backyard.
 June 25, 2026 · Ginger Park
7 Free Fun Events for Grown-Ups in July
Summer fun is for adults too! Mark your calendar for July library events you don't want to miss.
June 25, 2026 · Ginger Park
7 Free Fun Events for Grown-Ups in July
Summer fun is for adults too! Mark your calendar for July library events you don't want to miss.
 June 25, 2026 · Luanne Webb
Great Read Alouds: It's Time to Move It
Discover fun picture books that will inspire your kids to get moving. A moving child is a learning child.
June 25, 2026 · Luanne Webb
Great Read Alouds: It's Time to Move It
Discover fun picture books that will inspire your kids to get moving. A moving child is a learning child.
 June 24, 2026 · Abigail Siemers
What YA' Reading: Not What I Planned
Check out what happens in thrilling and magical books where things don't go at all as planned. Sometimes it's dangerous, sometimes scary, sometimes completely hilarious.
June 24, 2026 · Abigail Siemers
What YA' Reading: Not What I Planned
Check out what happens in thrilling and magical books where things don't go at all as planned. Sometimes it's dangerous, sometimes scary, sometimes completely hilarious.
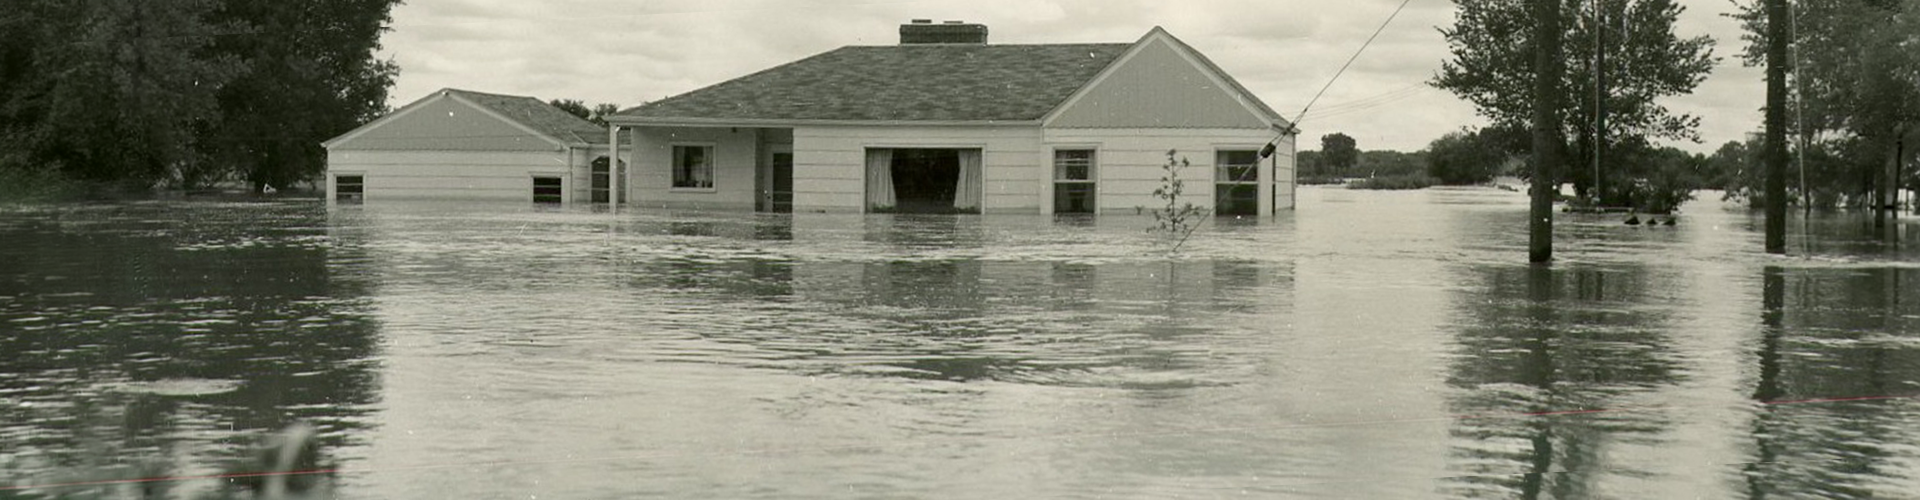 June 17, 2026 · Katie Keckeisen
The 1951 Flood: 75 years later
On July 13, 1951, the Kansas River Valley experienced one of the costliest and most devastating floods in the area's history, later called “the flood of the century.”
June 17, 2026 · Katie Keckeisen
The 1951 Flood: 75 years later
On July 13, 1951, the Kansas River Valley experienced one of the costliest and most devastating floods in the area's history, later called “the flood of the century.”
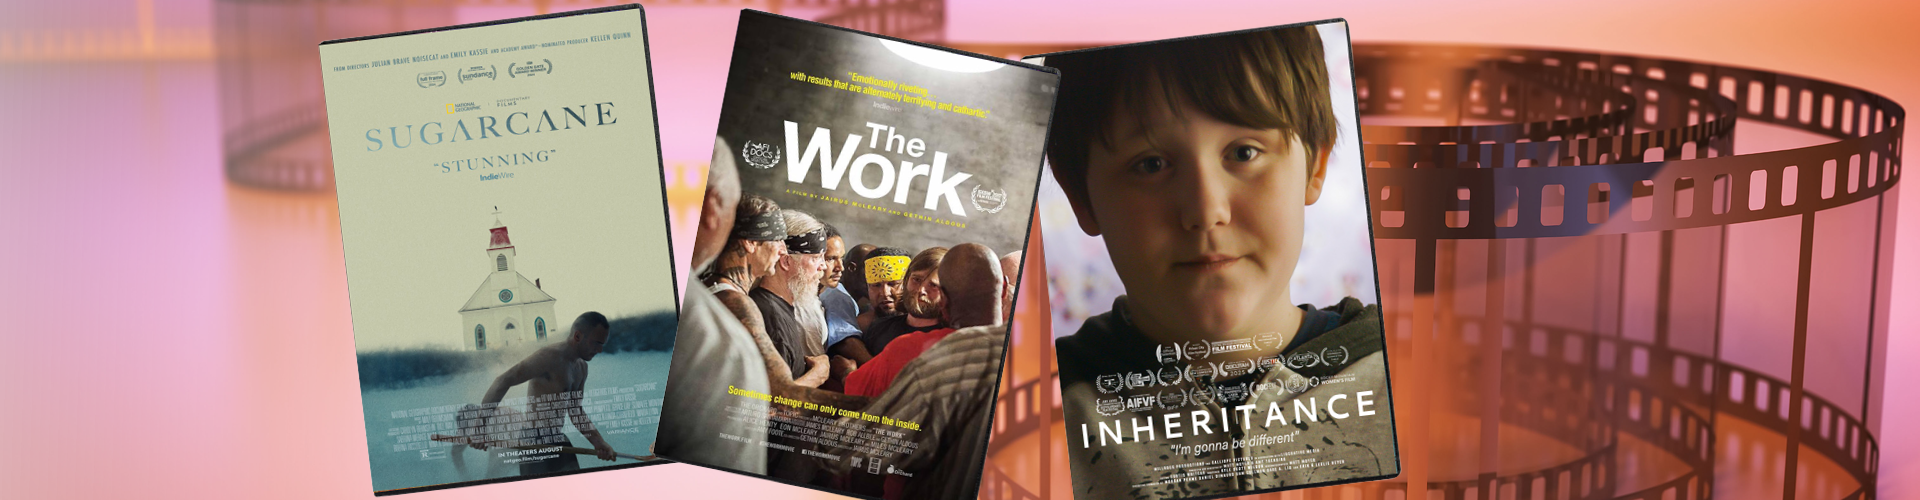 June 17, 2026 · Julie Nelson
The Reel World: Generational trauma
Watch these intense documentaries about the effects of trauma and addiction from generation to generation. These films examine the difficult work of healing from the scars of addiction, abuse and abandonment.
June 17, 2026 · Julie Nelson
The Reel World: Generational trauma
Watch these intense documentaries about the effects of trauma and addiction from generation to generation. These films examine the difficult work of healing from the scars of addiction, abuse and abandonment.
 June 10, 2026 · Ginger Park
Expand Your Listening Experience with West African Music
Music that includes the harp-like Kora can be peaceful or dance-able depending on the musicians. Experience the beautiful sound of this unique instrument.
June 10, 2026 · Ginger Park
Expand Your Listening Experience with West African Music
Music that includes the harp-like Kora can be peaceful or dance-able depending on the musicians. Experience the beautiful sound of this unique instrument.
 June 8, 2026 · Angela Portzer
Sashiko: Upcycling with embroidery
Sashiko is a versatile embroidery technique that is easy to get started & offers amazing results. It combines aesthetic beauty with functionality & efficient use of materials. It can be as simple or complicated as you'd like.
June 8, 2026 · Angela Portzer
Sashiko: Upcycling with embroidery
Sashiko is a versatile embroidery technique that is easy to get started & offers amazing results. It combines aesthetic beauty with functionality & efficient use of materials. It can be as simple or complicated as you'd like.
 June 5, 2026 · Chris Blocker
Fiction Five: Speculative Reads
Journey into these speculative tales that unveil new worlds both familiar and uncharted. Open the door to a magical June with the latest in fiction.
June 5, 2026 · Chris Blocker
Fiction Five: Speculative Reads
Journey into these speculative tales that unveil new worlds both familiar and uncharted. Open the door to a magical June with the latest in fiction.
 June 4, 2026 · Julie Nelson
Lost in the Stacks: Farther
Lace up your shoes and take a hike on America’s most iconic trails with thru-hiking legend Heather Anderson.
June 4, 2026 · Julie Nelson
Lost in the Stacks: Farther
Lace up your shoes and take a hike on America’s most iconic trails with thru-hiking legend Heather Anderson.
 June 1, 2026 · Lane Wiens, Shawnee County Horticulture Extension Agent
Keep your garden thriving all summer
Get master gardener tips to make your plants and yourself happy during the hottest season.
June 1, 2026 · Lane Wiens, Shawnee County Horticulture Extension Agent
Keep your garden thriving all summer
Get master gardener tips to make your plants and yourself happy during the hottest season.
 May 27, 2026 · Deanna Niles
Kid Tested, Librarian Recommended: Dino-mite reads
Explore books that will elevate your early readers as they dig deep into time-traveling tree houses, mysterious fossil discoveries and hilarious classroom escapades.
May 27, 2026 · Deanna Niles
Kid Tested, Librarian Recommended: Dino-mite reads
Explore books that will elevate your early readers as they dig deep into time-traveling tree houses, mysterious fossil discoveries and hilarious classroom escapades.
 May 26, 2026 · Andrew Ross
What YA' Reading: Road Trip!
Check out these YA novels featuring road trips that are by turns funny, heavy and romantic. The journey for the characters is always transformative making their end destination entirely new.
May 26, 2026 · Andrew Ross
What YA' Reading: Road Trip!
Check out these YA novels featuring road trips that are by turns funny, heavy and romantic. The journey for the characters is always transformative making their end destination entirely new.
 May 22, 2026 · Rain Schultz-Pruner
Great Read Alouds: Let's play outside!
Check out awesome picture books that celebrate the joys of being outside.
May 22, 2026 · Rain Schultz-Pruner
Great Read Alouds: Let's play outside!
Check out awesome picture books that celebrate the joys of being outside.
Back to Top


