Create a Paper Star
"This looks so complicated, and I'm not crafty. I'll never be able to make it!" said a customer at a recent library workshop. She was delighted to be incorrect, and she was photographed with her gorgeous handmade paper star before the end of the hour-long workshop.
Many people at the workshop were planning to make more stars with friends and family. One participant reported back later that she had left the workshop and taught her sisters and mother how to make these stars, and they went to work and taught their own classrooms of children.
More Arts and Crafts events will be offered at the library in the coming year. Check Library News for details of upcoming programs and explore the library collections for ideas, techniques and inspiration.
You can learn to create this impressive and beautiful paper star for yourself.
2 page handout Craft a Paper Star to save, print or share
Step 1

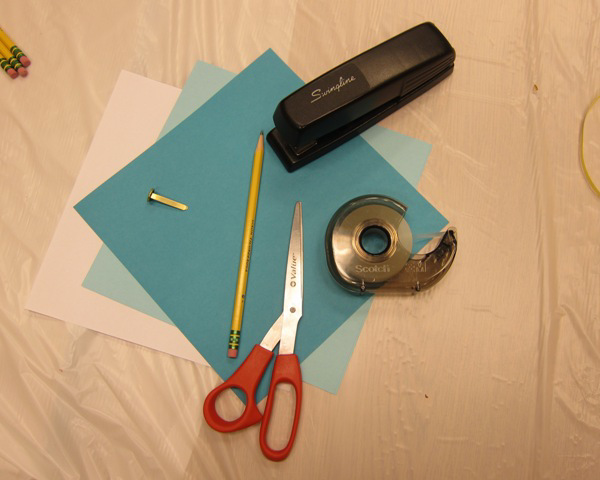
Gather basic supplies of paper, scissors, stapler, and tape.
Optional supplies include a ruler, a brad, a hole punch, and a pencil.
Regular white or colored copy paper works fine, or scrapbook paper.
The stiffness of the paper affects how many sheets you will need, between 6-8 sheets per star.
Step2

Fold your square in half diagonally. Fold it in half again diagonally.
Step 3

Cut several parallel lines through the paper, stopping about 1/2 inch from the folded edges.
Try cutting four lines for your first star, or more lines for a more advanced star with finer detail.
You can mark the lines evenly spaced with a ruler, or just estimate them.
Hints: BE SURE to cut from the thickest folded edge and parallel to the four open edges. The triangle should open away from you.
Step 4

Open up the paper after you have completed the cutting.
Step 5

Lift the first two points inside the diamond shape and overlap them, securing them with a tiny piece of tape.
Hint: Don't worry about making your tape perfectly invisible. The finished paper star looks so amazing that the small pieces of tape are barely noticeable.
Step 6

Flip over your paper, so that the small tube you just taped is now face down on the table. Take the next two smallest points of the diamond shape and overlap them, securing with tape.
Step 7

Continue to flip over your paper, taping the next two diamond points together, until you have completed all of the points.
Step 8

You have created one point of your star. Notice how in this picture, the left side is bigger/thicker than the other. When you complete all six of your star points, you will line them up so that they all face the same way, with the bigger sides to the left.
Step 9

Once you finish your first star point, make five more just like it. Note again how the points all have the larger loop to the left. In this example, all six star points are complete and awaiting assembly. For some paper thicknesses, you may need six, seven or eight star points to complete your star.
Step 10

Once your star points are lined up, use a stapler to connect them to each other. Take the outside loop from each star, line them up, and staple through the overlap where you taped. You should end up with one long line of star points.
Step 11

Gather together each of the bottom points of your line of star points. Depending on the supplies you have available, you can use a hole punch and a brad to connect all of the points in the center, or you can simply use a single staple through all of the point. To complete your star, staple the last two star point edges together.
Step 12

Hang your paper star and enjoy the beautiful decoration you made with basic supplies. Make more for friends or family, or even better, make more WITH friends and family.

Teach others how to make paper stars, and let them know you learned something amazing at the library. Explore more papercraft books at the library to discover new projects to try on your own.
Recommended books
Request these books from http://catalog.tscpl.org
- The Michaels book of paper crafts edited by Dawn Cusick & Megan Kirby
- Paper crafts for Christmas by Randel McGee
- Paper crafts with style: over 50 designs made with cut, folded, pasted, and stitched paper by Marie Clare Idées
- The jumbo book of paper crafts written by Amanda Lewis; illustrated by Jane Kurisu
- Decorative crafts sourcebook: recipes and projects for paper, fabric, and more
- Martha Stewart's encyclopedia of crafts: an A-to-Z guide with detailed instructions and endless inspiration by the editors of Martha Stewart Living
- Creative paper cutting: basic techniques & fresh designs for stencils, mobiles, cards & more edited by Shufunotomo
- Papercutting: tips, tools, and techniques for learning the craft by Claudia Hopf
- Simply paper cutting: hand-cut paper projects for home decor, stationery and gifts Anna Bondoc