Tunnel Books: An Easy Step-by-Step
As I was installing the current exhibit in the Sabatini Gallery, Telling Stories: Exploring Books Arts, I was taken with the tunnel book on display. The one that has struck me and other visitors is Octopus by Julie Chen. After spending time looking at this book, I decided to attempt to make one myself.
With the help of various how-to books in the library's collection, I present to you… my simple step-by-step photo essay: Zan’s attempt at making a three page tunnel book.
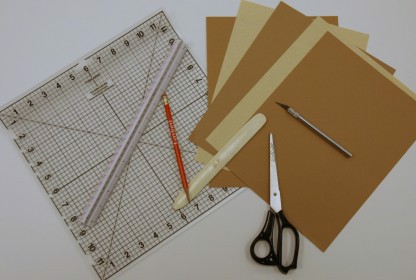
 Step 1: Gather your supplies. To make a simple three-paged tunnel book, you will need three pieces of paper for the image, two pieces of paper for the spine, a pencil, a ruler, an exacto knife and/or a pair of scissors.
 Step 2: This was the hardest step, deciding on a drawing or picture with either defined perspective or many objects clearly defined. Since my drawing skills are slightly lacking... I created a simple forest landscape.
 Step 3: After you have the drawing on each page, cut them out.
 Step 4: Time to make the spines. Take a sheet of paper and fold it in half.
Step 5: Cut the folded sheet in half, making two smaller strips of paper. Repeat step 4 and 5 with the second sheet of paper. You now have four strips of paper.
 Step 6: Take each of these four strips and make four M-shaped accordions. To make an M-shaped accordion, fold the strips in half lengthwise; then fold the edges back to the center fold.
 Step 7: Now we are ready to assemble the tunnel book.

Step 8: Place the back page on top of two of the M-shaped accordions, one on each side. Make sure that the creases are on the outsides, and glue the page to the back of the accordion (see photo for Step 9).

Step 9: Glue the next page to the top of the first M-shaped accordion. Next, attach the second M-shaped accordion pieces, one on each side. (You're sandwiching the middle page between the two M-shaped accordion folded pieces on each side.)

Step 10: Glue the front page of your book to the top of the M-shaped accordion strips at either side, and let the glue dry.
 Step 11: You have just made a tunnel book!
Now you try! You can make longer books by adding pages and making more M-shaped strips.
Check out these books for other altered book and book project ideas:
- Playing With Books: The Art of Upcycling, Deconstruction, and Reimagining the Book by Jason Thompson
- Making Handmade Books: 100 Bindings, Structures & Forms by Alisa Golden
- More Making Books by Hand: Exploring Miniature Books, Alternative Structures and Found Objects by Peter and Donna Thomas
- Eco Books by Terry Taylor
For more information about the amazing world of books arts, either stop by the Sabatini Gallery and see our current exhibition Telling Stories: Exploring Book Arts or call us at 784-580-4515.