Making 3D printed holiday gifts
You can use the library's Level 2 Tech Center to create 3D printed holiday gifts. You'll need to take an orientation class to get certified to use the 3D printers independently, and then you can make your 3D designs a reality. It only costs $2 for a 3-hour 3D print. You can probably print a few snowflakes in 3 hours. The tree ornament will take about 3 hours.
Snowflake ornaments
 I've made dozens of 3D printed snowflakes over the years. While they look authentic when printed in clear or white filament, a bright colored snowflake has a fun effect. You can also paint snowflakes with nail polish for additional sparkle and customization of your finished project.
Get started today, making snowflake designs. Use The Snowflake Machine by mathgrrl on Thingiverse to create a unique snowflake. You'll need to create a free Makerbot account to use the Customizer software in your web browser. Save your favorite snowflake designs, and download them to import into the Cura software at the library. When you are ready to print, scale and slice the design using Cura, then print it in 3D with the Ultimaker3 3D printer in the Level 2 Tech Center. This is a fun and easy first project to practice modifying and slicing 3D print files to prepare them for production.
Personalized tree ornaments
 I was inspired to experiment with this design after I saw an ad online recently. I used Tinkercad, a free online 3D design software. You'll need to create a free Tinkercad account to use the design software in your web browser.
To create my personalized tree ornament project
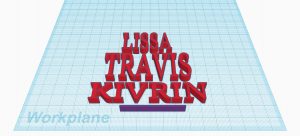 I changed the default "TEXT" shape to have a height "7" and a font "Serif" for each name.
- Once I typed in each name in all CAPS, I dragged them around, resizing them taller or wider as needed to make a basic triangle or tree shape with the names stacked on top of each other.
- I moved the letters so they overlapped a little bit, changing my view several times as I worked to see the 3D design from different perspectives.
- To reinforce the strength and structure of the design I added a thin rectangle on the top or bottom of each name.

- I used the basic shape "square" and then changed the height to "7" and the length to "1" and the width to "50" and then copied that same "line" shape multiple times so I could use it between each name. I also changed the color to purple in the software to make it easier to see the difference between the names and the line. Once I adjusted things together, I added a star and a ring to the top.
- In a later version, I added a "2022" to the bottom of the design to represent the tree trunk.

A few Tinkercad tips for this project:
- The mouse buttons each do something different. Use the left button to move an element. Hold the center/scroll button to drag the view, and the right button to rotate the perspective.
- The preset options on the left side of the screen helped me when I rotated upside down and backwards.
- Zooming in gave me more control over the tiny adjustments to add the reinforcing line between the names.
- Turning off the Snap Grid in the lower right helped me move and adjust objects in smaller increments, with the arrow keys.
Preparing to print
 Once I was happy with the design in Tinkercad, I exported it for 3D print as an .STL file.
 In the Cura software in the library's Digital Art Studio, I scaled and sliced the design, making sure the final project could print in less than 3 hours. I saved my file to a USB drive and reserved the 3D printer for at least as much time as my project file would take to print. I watched with delight as my fun ornament was created from filament on the Ultimaker 3D printer. After my successful print, I worked with the Level 2 Tech Center staff to pay the $2 fee for my print at the kiosk.
 This ornament is my first big attempt at designing a more complicated 3D printed object instead of downloading someone else's design. I am very happy with the results and proud of myself for sticking with it to learn how to create something fun and functional.