Folded Castle Book
Supplies
- 2-sided template
- Scissors
- Pen, markers, pencils or any coloring supplies you have
Step 1

Step 1
Fold the template in half horizontally with the small towers on the outside.[/su_column]
Step 2

Step 2
With the first fold up as a mountain, fold each long side toward the center fold.
Your paper should look like a "W".[/su_column]
[/su_row]Step 3

Step 3 a/b
Turn the paper over.
Starting from the outside edges, fold each side section toward the first fold on each side.[/su_column]
Step 4
Step 4 a/b
Fold the next 2 sections in half again.
Now flatten the middle fold.[/su_column]
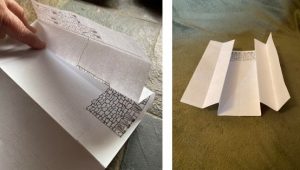
[/su_row]Step 5
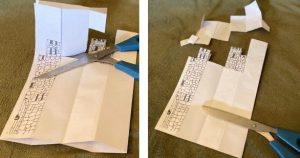
Step 5 a/b
Unfold and open the paper. Now fold it in half. (Like in Step 1)
Next cut on the lines and around the towers. If you want, you can cut the tops of the doors so they open.
Be careful not to cut the doors off!
Step 6

Step 6
With a pen, pencil or marker, fill in any leftover white edges of the paper to complete the castle design.
(DO NOT CUT EDGES at the top of castle or front section with doors.)[/su_column]
Step 7

Step 7
Now you are ready to write, draw, and/or collage your unfolding story.
[/su_column][/su_row]