


Teen Art Club: Textures, Colors & Quotes, Oh My!
 Hey Friends! This edition of Teen Art Club is a little less formal. While we paint, let's focus on the texture we're creating with our brush strokes. Do you prefer to have smooth, glossy paintings? Or do you enjoy being able to see virtually every brush stroke? I'm in the latter group. Art history demonstrates that both styles, as well as a multitude of styles in between, all have a place in the world of art.
Planning
Let's jump right in! Here's what you'll need for this project:
- Paint Brush(s)
- Acrylic Paint (or the paint of your choice)
- Wooden Box Sign (or plank or canvas)
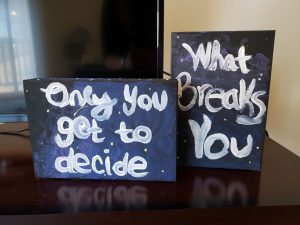
Alrighty, to begin you'll also need a well-ventilated area and something to cover the surface you're painting on. Before you begin painting, try to imagine what your finished product will look like. If you're adding script like I chose to, learn from my mistakes and practice spacing your words first. My original intent was to make two signs with different quotes, but I ended up not giving myself enough space and have one quote divided between my two signs.
Start Painting
Once you've chosen a design, apply your base coat. Use your brush to add or smooth your texture. You can use swirls, lines, hatch marks or even add a hidden message within the texture of your base color.
Your next step is to add your second color. I recommend giving your base layer a few minutes to dry. Having it a little wet still is good for color blending and mixture. I like to emulate the texture style of my base coat with my additional coats, but this is your project so you do you!
I used a black base and added midnight blue over the top of half the space. I allowed that a couple minutes to dry. Then I added my third, and final color, over about 1/3 of the midnight blue and a bit of the remaining black area.
Once I finished blending and texturizing my colors, I added my script using one of my favorite quotes from A Court of Wings and Ruin by Sarah J. Maas. It says "Only you get to decide what breaks you." This is a quote that inspires and motivates me. Whether you choose to add a quote, a sketch, or to leave it as a gorgeous study of color blending and texture, make sure your final product inspires you.
Check out some of our books on painting styles and techniques! Also surf Creativebug to find more inspiration and tutorials.
