


Origami for the Holidays
 Origami has evolved in to a modern art form. The goal of this traditional Japanese art is to transform a flat sheet of paper into a finished sculpture through folding and sculpting techniques.
The only supply you need for your first origami project is a square piece of paper.
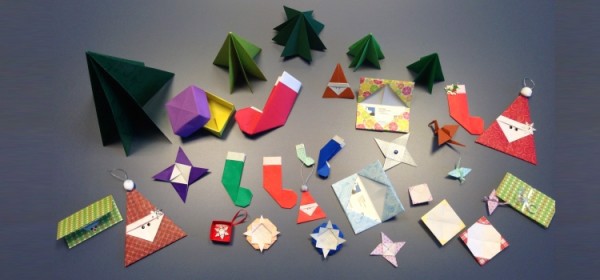
Start with these projects that customers made at a recent library program:
- Origami Box Instructions
- Origami Pine Tree Instructions
- Origami Star Instructions
- Origami Crane Insructions
- More Christmas Origami instructions
Check out origami books from the library's collection for more ideas. Browse at call number 736.982 in the adult non-fiction or Kids Library, or request them at http://catalog.tscpl.org.
- Making origami Christmas decorations: step by step by Michael G. Lafosse
- Origami for Christmas by Chiyo Araki
- Origami holiday decorations: for Christmas, Hanukkah, and Kwanzaa by Florence Temko
- Origami ornaments: the ultimate kusudama book by Lew Rozelle
- Minigami: mini origami projects for cards, gifts and decorations by Gay Merrill Gross
- Paper creations, cards and gifts by Steve Biddle
Make your own Origami Gift Card holder
Use any kind of paper, including scrapbook paper, magazine pages or origami paper.
For a gift card holder, use a 9” square. Print instructions for the origami gift card holder (2 page PDF).
Step 1

Place the paper with the design side down. Fold the sheet in half and open it back up.
Step 2

Fold the left and right edges inward to meet the vertical fold in the center.
Step 3

Open the paper again. Fold each corner in diagonally, to align with the nearest crease.
Step 4

Close the left and right flaps to the center.
Step 5

Turn the paper over. Fold the top down so that the diagonal edges come to a point exactly at the crease.
Step 6

Fold the bottom up in the same way. Where the two diagonal flaps overlap, tuck the edges together.
Step 7

Insert a card to make sure it fits, then fold the case in half. NOTE: card is inserted to vertically, into the left pocket created by the two diagonal folds, not into the fold you made in Step 6.
Step 8

Fold and go! Or, decorate the gift card case with tape, ribbon, stickers or stamps!
Step 3
here